How To
How to use Gmail’s new email scheduling tool
- April 30, 2019
- Updated: July 2, 2025 at 5:02 AM

On April 1 Google announced that it was finally adding a “Schedule email” feature to Gmail. The feature has been rolling out since, but as there are over 1.5 billion Gmail users around the world, it is taking a while for everybody to get the update. Don’t worry though, it is coming and if you haven’t got it yet, you’ll have it soon enough.
Gmail’s new Schedule email feature will work on both personal and enterprise Gmail accounts and allows users to schedule emails up to a whopping 49 years in advance. Yep, if you think you’ll have the same email address in the year 2068, you can schedule an email to yourself to see how things are going in the future.
How to schedule emails on Gmail on the web
The new scheduling feature for Gmail is simple. So simple that it should kill off all those third-party apps and extensions that popped up over the years trying to fill the scheduling void that Google had left in Gmail. They’re simply not needed anymore. All you need to do to schedule an email using Gmail is:
Step 1
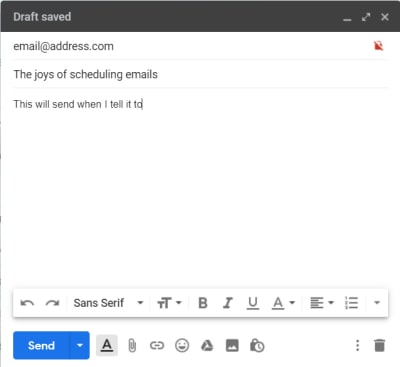
Write out your email as you normally would.
Step 2
![]()
Then, when you’re ready to schedule it, click the small arrow icon next to the Send button.
Step 3
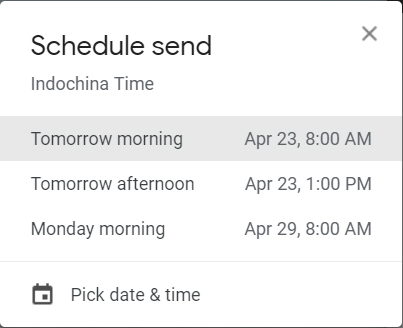
Clicking Schedule send will bring up the menu that lets you decide when you want the email to arrive in the recipient’s inbox.
Step 4

Once you’ve decided on the time and date, click Schedule send and rather than seeing the usual “Email sent” you will see the “Send scheduled for…” message including the time and date you’ve selected.
This is how to schedule an email on Gmail using the app on your phone
Step 1
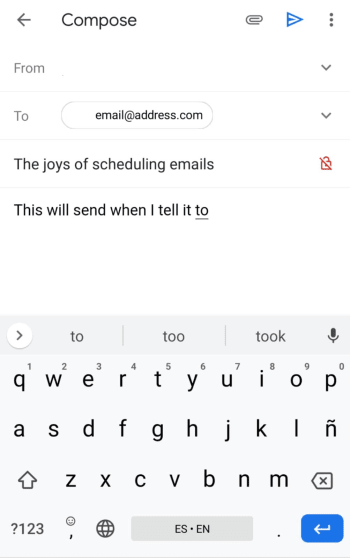
Write out your email as you normally would.
Step 2
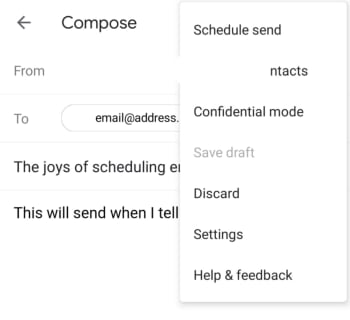
Hit the three vertical dots icon next to the Send button and select Schedule send.
Step 3
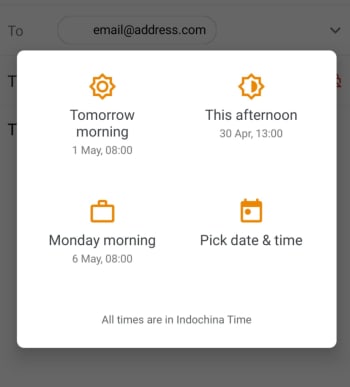
This will bring up the menu that lets you decide when you want the email to arrive in the recipient’s inbox.
Step 4
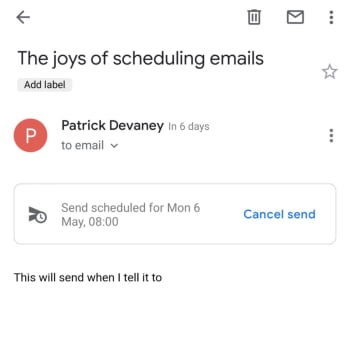
Once you’ve decided on the time and date, click Schedule send and rather than seeing the usual “Email sent” you will see the “Send scheduled for…” message including the time and date you’ve selected.
The new feature is also good if you’re the type of user who constantly notices mistakes once you’ve sent the email. Scheduling an email will save it as a draft, so if you always schedule your emails to send an hour after you’ve written them, you’ll be able to check everything a little later on before Google pings it off to the recipient.
To check an email that has been scheduled all you need to do is click Scheduled in the side menu and then select the email you want to check. You can then edit the email to change out any mistakes or delete it and cancel the send altogether. At this stage, you can also change the time and date the email is scheduled to send.
Patrick Devaney is a news reporter for Softonic, keeping readers up to date on everything affecting their favorite apps and programs. His beat includes social media apps and sites like Facebook, Instagram, Reddit, Twitter, YouTube, and Snapchat. Patrick also covers antivirus and security issues, web browsers, the full Google suite of apps and programs, and operating systems like Windows, iOS, and Android.
Latest from Patrick Devaney
You may also like
 News
NewsAfter sweeping through its country, the Portuguese version of the most iconic series of Spanish television arrives
Read more
 News
NewsThis remake of an iconic film about marital collapse arrives in theaters
Read more
 News
NewsOrange Belgium is facing a significant data leak affecting 850,000 customers
Read more
 News
NewsThis new Netflix series delves into a political crisis led by women
Read more
 News
NewsThe AI tools and how they are redefining the online presence of companies
Read more
 News
NewsDaniel Day-Lewis returns after 8 years of retirement, and he does it in style directed by his son
Read more
